Tips for Conquering the Trail Alone
Last year, I shared some general safety tips for hiking in Japan. This time, we’ll delve deeper into solo hiking and the extra precautions you can take to stay safe when exploring the trails on your own. Solo hiking can be an incredibly rewarding experience, but it also requires careful planning. Here are 6 more things to think about before you set out. For the record, I’m not necessarily advocating for others jump on the solo hiking bandwagon. Statistically speaking, being in a well-led group in the mountains is safer.
Why Even Go Solo Hiking?
Surely, hiking with others is a lot more fun! I used to believe this wholeheartedly, and in fact, before coming to Japan, I had only ever hiked in a group or with at least one other person. Back then, hiking was always presented as an activity best enjoyed in the company of others.
Coming to Japan, however, all this changed. I began to notice the large number of people who hike by themselves and seem to truly relish it. Witnessing this was enough encouragement for me to try it for myself, and let me tell you, I haven’t looked back.
Flexibility is King (or Queen)
While there are many reasons to hike alone, flexibility is probably the main advantage, at least for myself. When it comes to getting up and deciding whether or not to go hiking, I’ll admit, I can be a bit unreliable. There have been countless mornings where I’ve been torn between hitting the trail and staying in, mainly due to the weather or how I’m feeling that day. This applies not only to day hikes but also to multi-day adventures. If I’m with others, and they’re counting on me, I obviously have to follow through, which can be limiting. Hence, solo hiking is a perfect solution for my indecisiveness.
#1 Don’t Overestimate your Abilities
Solo hiking offers one of the best ways to reconnect with nature, but safety should always be a top priority. Extra careful consideration and preparation are necessary, more so than in a group setting, as you need to be self-sufficient and rely on your own intuition. Overestimating your abilities can lead to dangerous situations. Be honest with yourself about your hiking abilities, physical fitness level, and experience. Don’t attempt trails or routes that are beyond your skill level or comfort zone.
I remember when I was planning my first overnight hike in the Tanzawa Mountains. Initially, I considered making it to Mt. Hirugatake on the first night. How glad I am that I didn’t! By the time I arrived at Mt. Tanzawa, I was spent. After all, it is a 1,300-metre haul, and the additional two hours to Mt. Hirugatake would have been too much. The moral of the story here is that less is more when first starting out and finding your hiking legs.
Tool for the job: Use YamaPlan to calculate route distances and time accurately.
#2 Prioritise Safety over Speed
When it comes to my hike reports, I sometimes sees comments like ‘the trip itinerary says 2 days, but you don’t need 2 days’. Solo hiking demands a distinct approach compared to group hikes since you’re solely responsible for your safety and well-being. Taking your time and being deliberate in your movements is crucial for mitigating risks and maximising enjoyment. By exercising caution and awareness, you’ll be better equipped to identify potential hazards like getting lost, encountering wildlife, or sustaining injuries due to rushing. This mindfulness allows for sound decision-making and swift reactions if necessary.
Conserving energy is especially important, since you’ll likely be carrying all your gear. Pacing yourself ensures sufficient stamina for the entire hike, warding off exhaustion and reducing the risk of injuries. Rushing, conversely, can lead to hasty navigation choices. Taking the time to study your route, carry topographic maps and a GPS device, and follow trail markers significantly decreases the likelihood of getting lost—a major concern for solo hikers. By being wary of not overexerting yourself, you’ll have more time to assess situations and potentially ask for help if needed.
While it may be tempting to push through during a multi-day hike like the Southern Alps Traverse to shorten the duration, consider the possible downsides. Spending more time on the trail actually work against you. Given that clear skies are more frequent in the mornings, while clouds and mist tend to roll in later, it could mean you fail to benefit from the scenery you worked so hard to reach. Try leaving at or before daybreak and arriving at your campsite by early afternoon to allow yourself the best chance to enjoy the best views.
Hiking is about embracing the entire experience, not solely reaching the destination. Slowing down allows you to fully immerse yourself in the beauty of the mountains, appreciate the scenery, and savour the unique experience that solo hiking offers.
Tool for the job: Check Tenki to Kurasu for the latest weather forecast information.
#3 Focus on Trail Safety
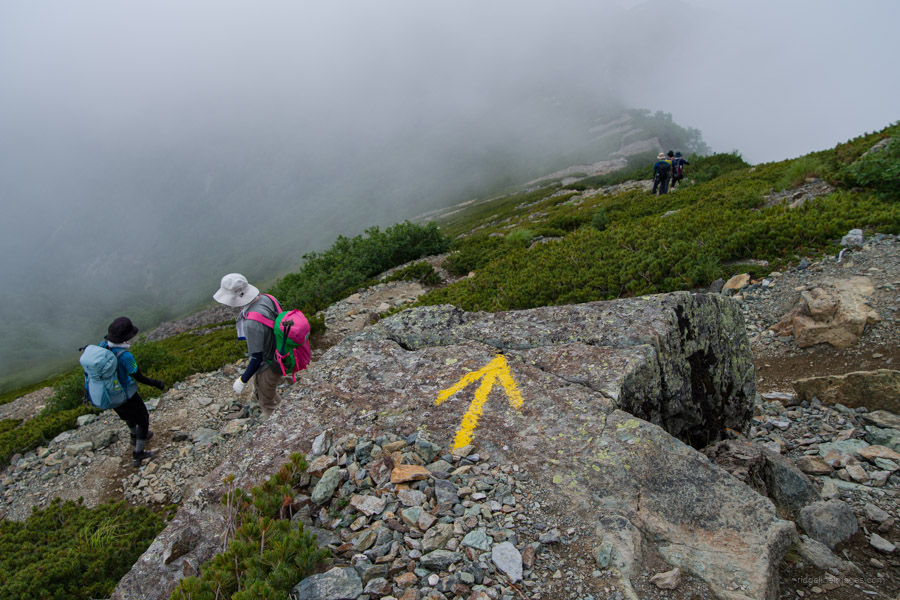
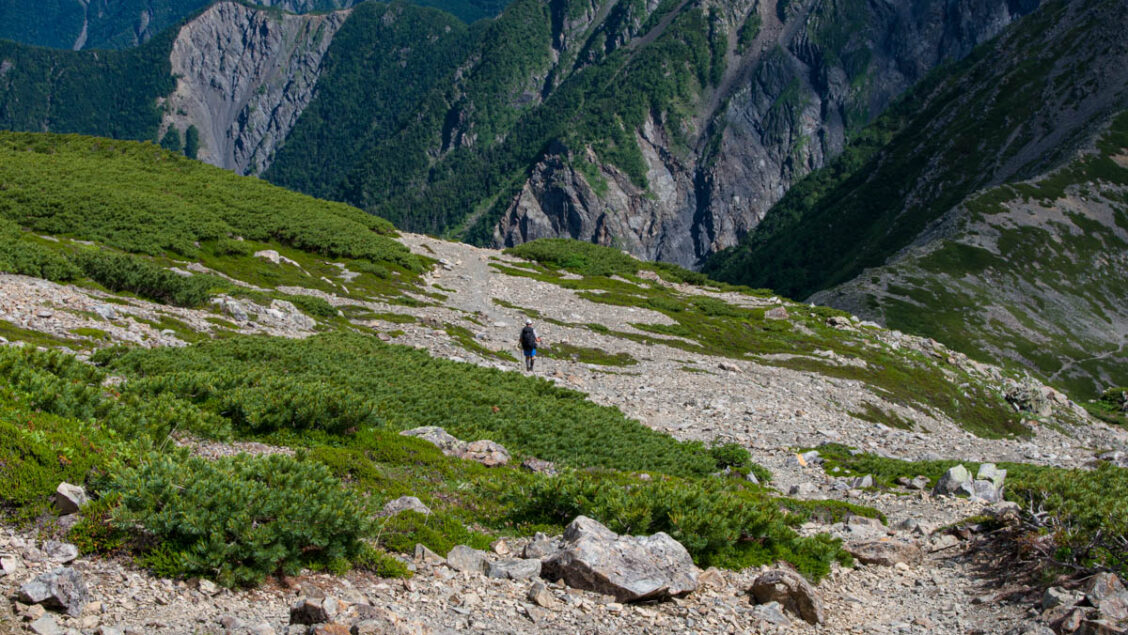
Solo hiking on steep terrain, common in much of the Japanese Alps, demands extra caution due to the complex and challenging nature of the landscape. The loose rock and scree slopes necessitate additional care. Move slowly, test the stability of your footing before committing your weight, and utilise trekking poles for added support. This precaution is especially true after rainfall or when ice and snow are present.
Before setting out on any solo hike, thorough research is essential. Don’t be misled by a trail’s seemingly easy designation or apparent short distance; progress can sometimes be painstakingly slow. Make use of resources like Yamap and Yamareco to gather information on the latest trail conditions and possible risks. When in doubt, opt for less taxing routes, especially when venturing out alone.
For new solo hikers, go for well-marked paths that provide a sense of security and make navigation easier, reducing the risk of getting lost. At least initially, try to avoid overly challenging terrain to help prevent accidents. And always trust your instincts—if a trail seems sketchy, don’t hesitate to turn back or choose an alternative route. The same goes for tackling a ladder or fixed chain; take a moment to figure out the best footholds before you make your way up.
Where possible, steer clear of dashed or dotted routes on the Yama to Kōgen Chizu (Maps of Mountains and Plateaus). These trails often call for more advanced navigation skills and may be less maintained, increasing the likelihood of difficulties, particularly for solo hikers. Moreover, encountering other hikers can be rare on such remote trails, emphasising the need for self-reliance and preparedness for emergencies.
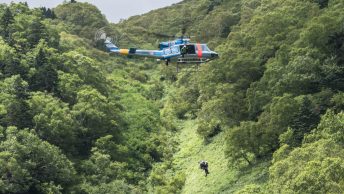
Remember, unexpected situations can arise, and getting stranded on a challenging trail without assistance can pose significant risks. Always exercise conservative judgement and refrain from pushing your limits. It’s not uncommon for solo hikers in Japan to underestimate the hike, leading to exhaustion and the need for rescue. Prioritise safety by selecting appropriate trails and staying within your capabilities.
#4 Listen to your body
Hiking alone requires a heightened level of self-awareness, as you assume sole responsibility for monitoring your well-being throughout the journey. Even if you don’t feel fatigued, take frequent breaks to allow your body to rest, rehydrate, and refuel. Regular pauses are essential to maintain a sustainable pace and prevent exhaustion later on the trail.
Similarly, heed your body’s fatigue signals. Early signs such as increased effort, difficulty concentrating, or muscle weakness indicate the need for rest. Pushing through fatigue can impair judgement and elevate the risk of accidents. Take breaks, assess your energy levels, and adjust your pace accordingly. If necessary, don’t hesitate to turn back to ensure your safety.
Dehydration can be insidious, especially in warm weather or during exertion. To prevent it, monitor your fluid intake regularly and drink water even before feeling thirsty. Symptoms like dry mouth, headache, or dizziness may signal dehydration. If you experience any of these signs, take immediate steps to rehydrate. The same vigilance applies to hypothermia. If you start shivering, experience slurred speech, or mental confusion, get away from exposed areas, remove any wet clothing, layer up with warm clothing, and seek shelter if possible.
Lastly, be mindful of any pre-existing health conditions and be guided by your body’s warnings. If you experience unusual discomfort, pain, signs of blisters, or other concerning symptoms, stop and assess the situation.
#5 Your Great Allies are Other Hikers
When hiking solo in Japan, your fellow hikers become invaluable allies. Even if your Japanese language skills are not fluent, a simple greeting or exchange of basic information can go a long way. As you pass other hikers along the trail or at rest spots, take advantage of these chance encounters. Always offer an aisatsu (greeting) like “ohayō gozaimasu” or “konnichiwa”. These greetings are not only good etiquette but also facilitate the exchange of information such as trail conditions, weather updates, or impending hazards.
Even with limited Japanese, gestures and drawing can still convey valuable information. Some hikers might also share tips on viewpoints, hidden gems, or even onsens at the end of the trail. On numerous occasions, I’ve enjoyed having long conversations after hours of solitude on the trail. Therefore, always make the effort to connect with fellow hikers. Despite language barriers, a shared love for the outdoors fosters camaraderie and enriches the hiking experience, making it safer and more enjoyable for everyone involved.
#6 Prepare for Emergencies
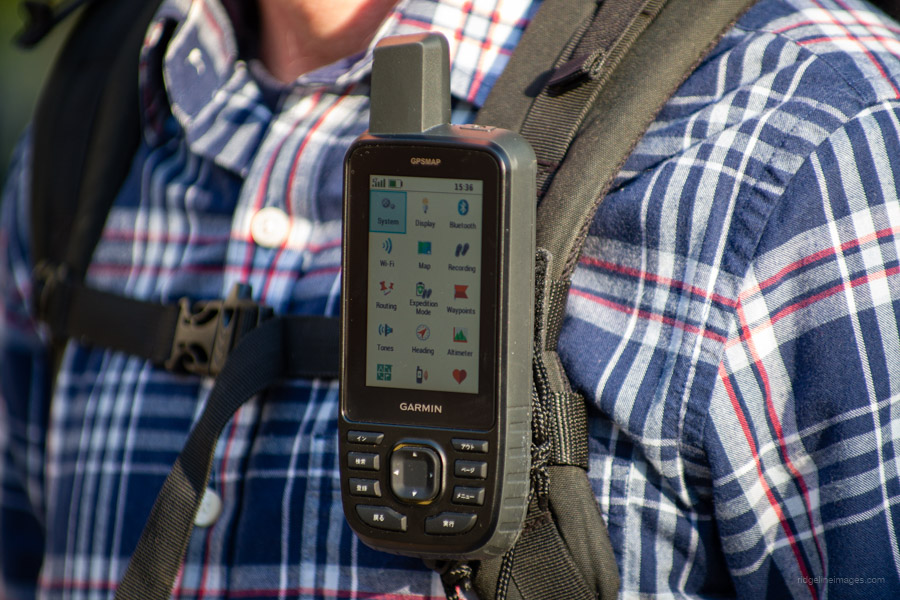
Venturing out on a solo hike demands thorough preparation for potential emergencies. Essential safety equipment can become your lifeline in critical situations. Consider carrying a Cocoheli radio transmitter, or for even greater reliability, a two-way satellite messenger device. These devices allow you to send distress signals and communicate with emergency services, bridging gaps in remote areas where cell phone reception is unreliable or non-existent. Make sure you know how to use them and have a plan for contacting emergency services, including insurance providers like Cocoheli and JRO.
While smartphones offer navigation and communication capabilities, they shouldn’t be your primary tool. They are susceptible to battery depletion, signal loss, and damage from the elements. Treat them more as supplementary accessories and prioritise a dedicated, standalone GPS like a Garmin GPSMAP 67 that can receive and display the latest L5 Block III satellites, routinely achieving an accuracy of 1.8 metres. If you have any doubts, refer to my recent comparison to see how a flagship smartphone with dual-frequency GPS support fares against a dedicated GPS device. Let’s just say the smartphone didn’t have a stellar day. Purpose-built GPS devices offer reliable navigation and are designed to withstand the challenges of outdoor environments, making sure you have consistent location awareness.
Lastly, submit your backcountry plan at the tozan posuto box located at the trailhead and ensure it is also in the regional police databases using the web app Compass (English available). By taking proactive measures and arming yourself with the right emergency equipment and a communication plan, you can set forth on your solo adventure with confidence, knowing you are prepared to handle any unforeseen circumstances that may arise.