
A Periodic Table of Peaks
The third field guide of the year is also the biggest. After two pocket-sized cards, this one brings all 100 of Fukada Kyuya’s famous mountains together on a single A3 sheet, laid out so the whole list can be taken in at a glance and, importantly, planned from Tokyo.
There are plenty of books, maps and websites that explain what the Hyakumeizan are, along with detailed guides and route descriptions for individual mountains. What I kept wanting, and could never find, was something more practical: a clear overview of all 100 mountains that also showed what it actually takes to hike them from Tokyo.
Which ones can I do as a day trip? Which are realistic for a weekend? Which need a longer trip? Where are they all? When should I go? And how many have I ticked off?
These are the types of questions this field guide is designed to answer. It puts all 100 mountains in one place, with their location, height, region, season, transport options, commitment grade and trip length from Tokyo. The aim isn’t to replace the detailed guides you’ll need for individual mountains but to give you the bigger picture before you start planning.
In other words, it’s a way of looking at the Hyakumeizan as a whole and working out how the 100 mountains might fit into your own plans.
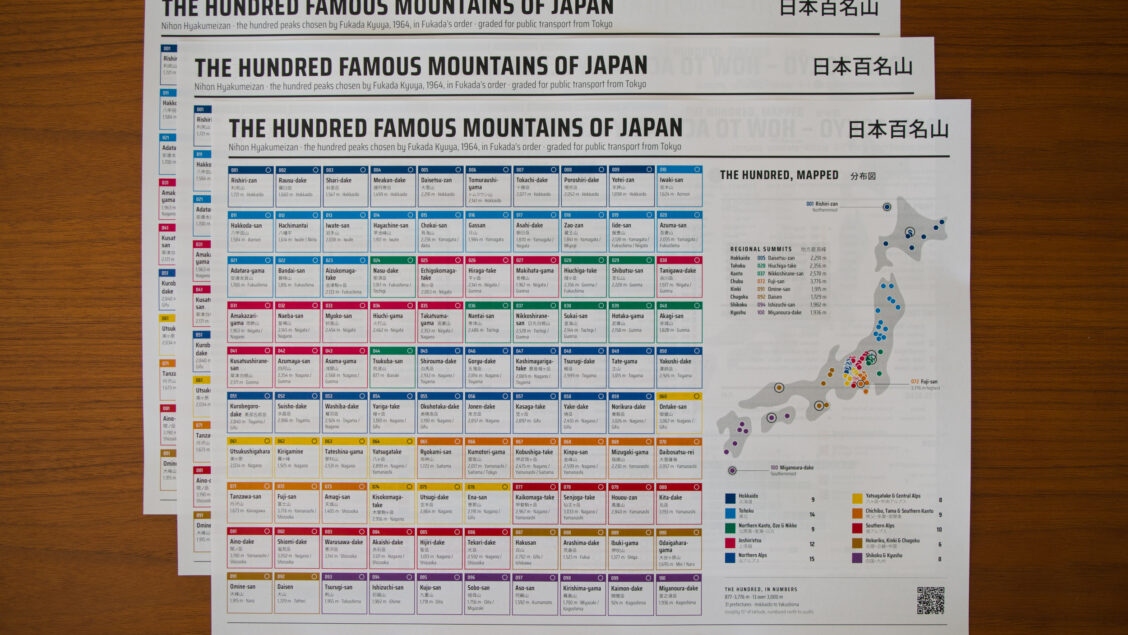
Hyakumeizan field guide in an A3 plastic sleeve.
What it is
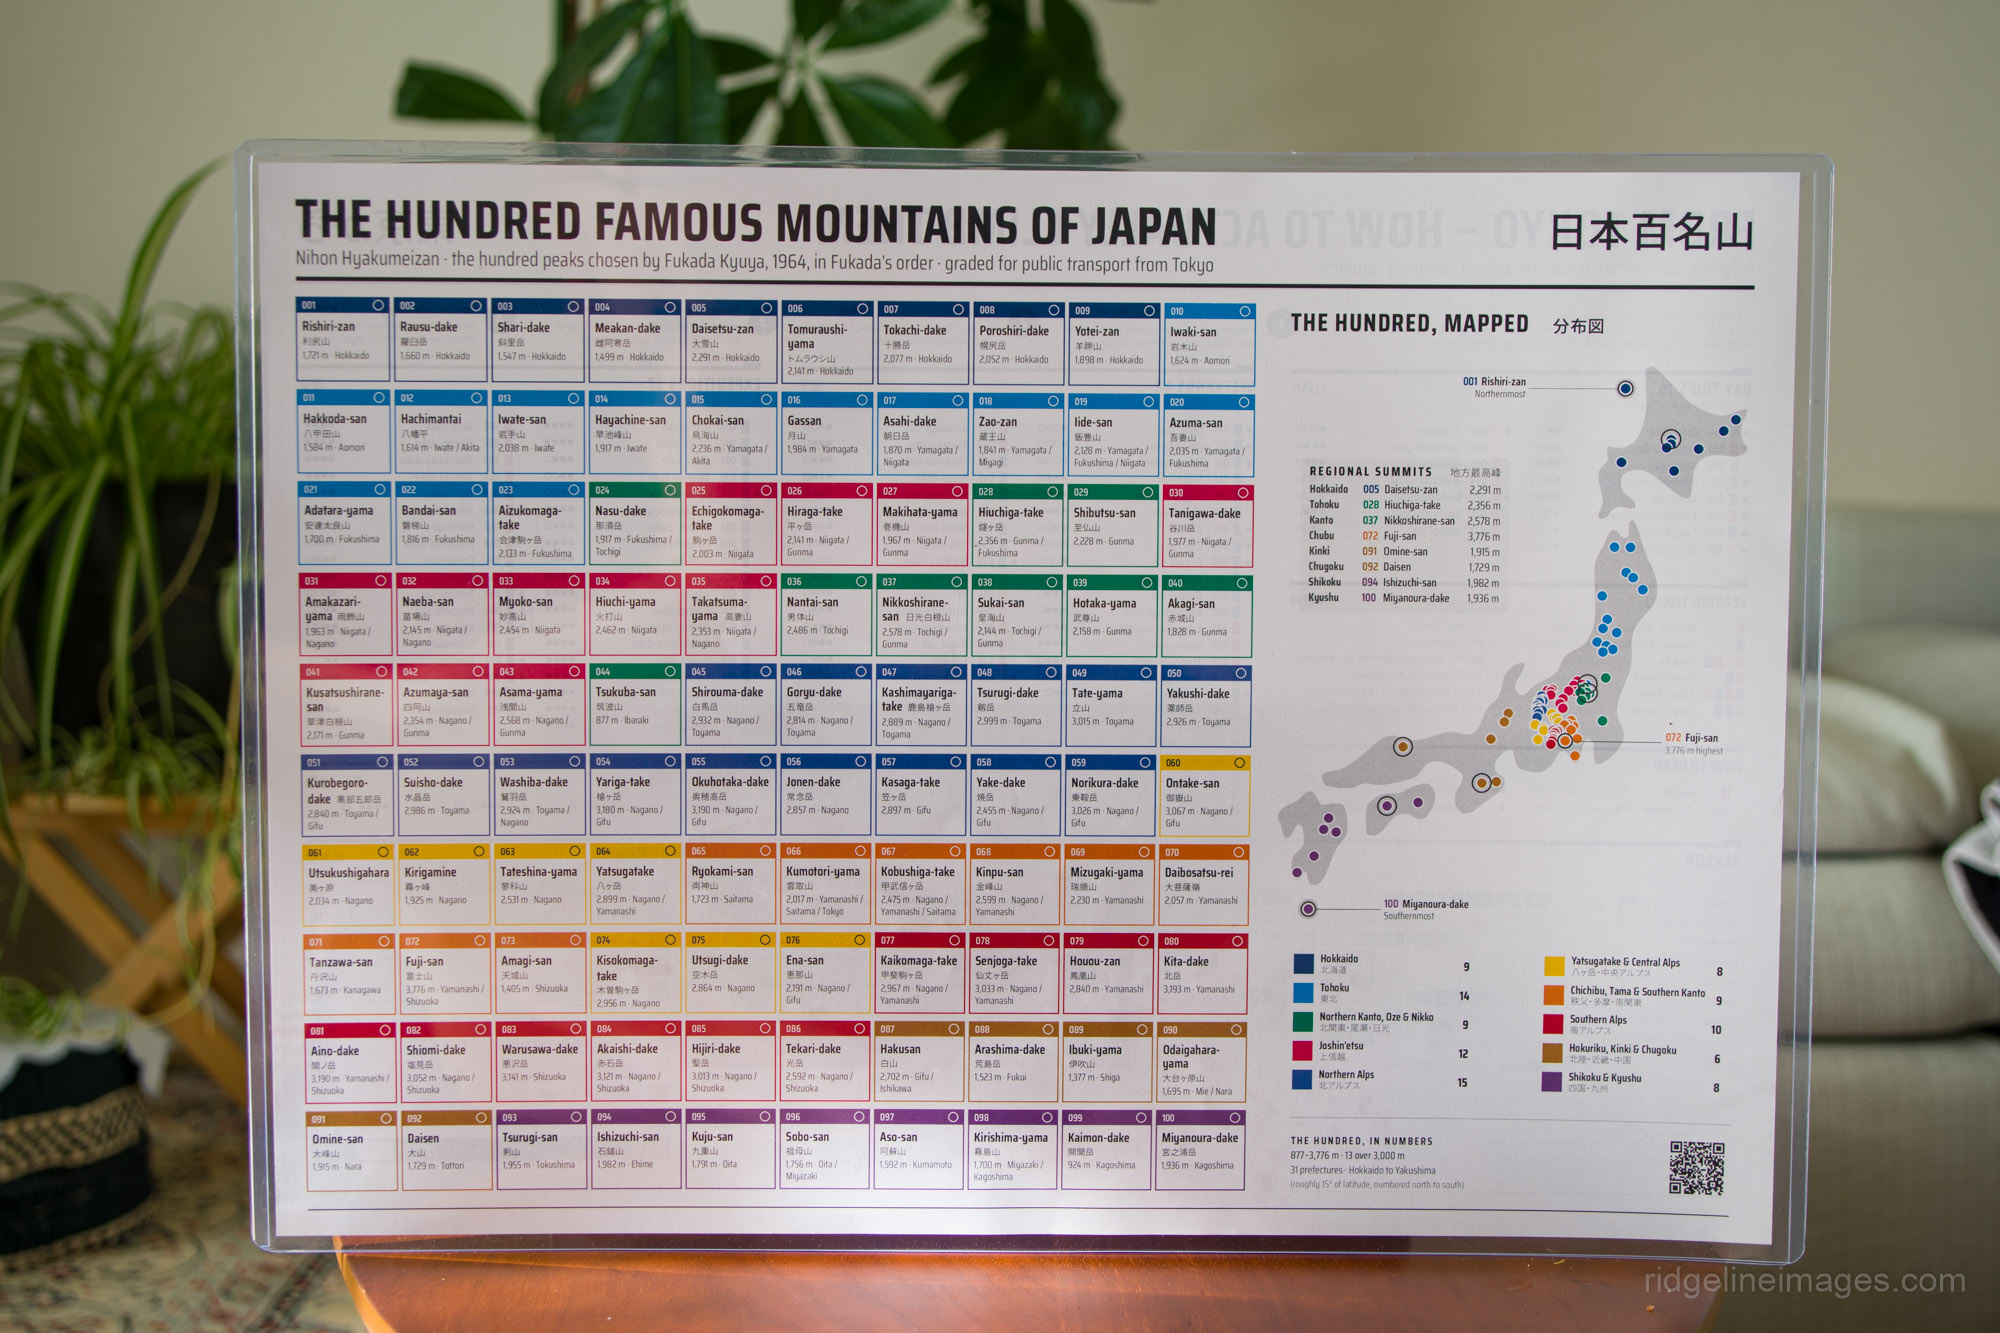
The front is the chart. Inspired by the periodic table, it lays out all 100 mountains in a 10×10 grid. Each tile shows the mountain’s number, name in romaji and kanji, elevation and prefecture(s), with the tiles colour-coded by region. A map of Japan with all 100 mountains plotted sits alongside, showing how the regions are distributed across the country.
The front is deliberately free of ratings and planning information. It simply shows the list as it is – all 100 mountains, in Fukada’s order, with their basic details.
The back is the From Tokyo planner. It takes the same list and asks a more practical question: what’s involved in getting to and hiking each mountain from Tokyo?
The mountains are divided into Day Trips, Weekends and Expeditions, plus a marker flagging some of the easier ones to start with. There’s also a season strip, a 1–4 commitment grade for the hike itself, a 1–100 progress grid and a regional tally using the same colour scheme as the front.
You can mark off mountains on screen using your PDF reader’s markup tools, or print the sheet, stick it on the wall and use a pen.
Why the Hyakumeizan?
Long-time readers will know I have mixed feelings about the Hyakumeizan. I wrote about that at length in The Trouble with the Hyakumeizan.
But you don’t have to believe these are Japan’s 100 best mountains to recognise the extraordinary influence of Fukada’s list. For generations of Japanese hikers, it has provided a ready-made set of mountains to work through, while influencing guidebooks, maps, hiking clubs and the way people plan and approach hikes in Japan.
So even with my reservations about the list itself, it makes sense to have a clear overview of it. For me, the more interesting question isn’t which mountains are on the list, but how you go about hiking them.
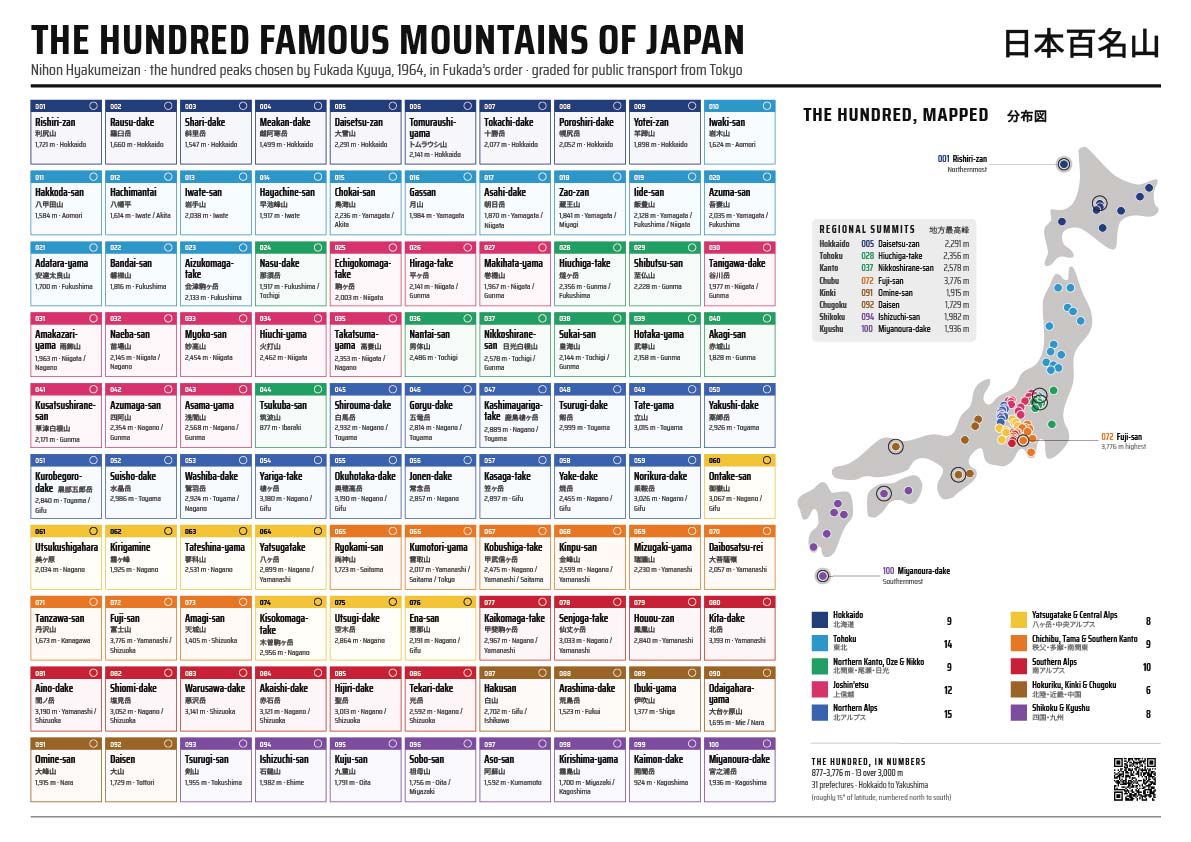
Front: a periodic table of peaks.
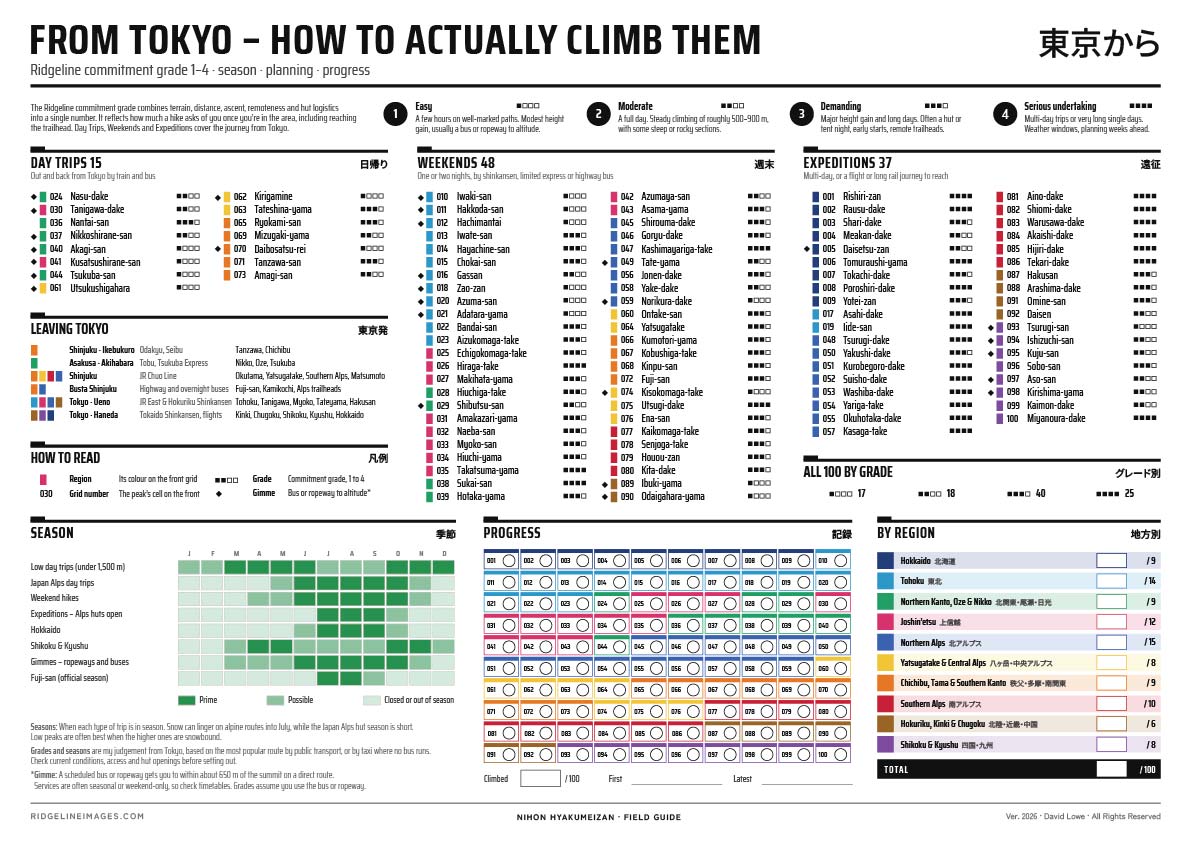
Back: what it takes to hike each one from Tokyo – day trip, weekend or expedition.
The From Tokyo problem
Knowing that a mountain is 2,500 metres high and that it takes five hours to reach the top tells you something about the mountain. It doesn’t tell you much about the trip. From Tokyo, one mountain might be a straightforward day trip on public transport. Another might need an early train, a bus and an overnight stay. Another might mean an overnight bus, several days in the mountains and a carefully timed return. Some of the more remote peaks involve flights, pricey taxi rides or long approaches before you even start hiking.
The classifications on the back are therefore deliberately Tokyo-centric. That’s where many of my readers start from, and it’s where I start from. Public transport is an important part of the equation for me. I do drive in Japan, but I prefer to hike using trains and buses, so when I look at the Hyakumeizan, I’m naturally thinking about how I’d reach each mountain from Tokyo without a car. That gives the planner a consistent starting point: every grade assumes you’re travelling by train and bus. It’s also how many others get around, and it frees you to finish a hike somewhere other than where you started.
Although the planner doesn’t provide travel times, it shows roughly what sort of trip each mountain involves from Tokyo. The Leaving Tokyo panel takes this a step further, matching departure hubs with the lines they serve and the regions they reach – whether that’s Shinjuku for the Chuo Line or Busta Shinjuku for overnight buses.
If you’re based in Osaka, Sapporo or Fukuoka, the Tokyo-specific parts of the back won’t apply, but the chart, map, commitment grades and progress grid work wherever you live.
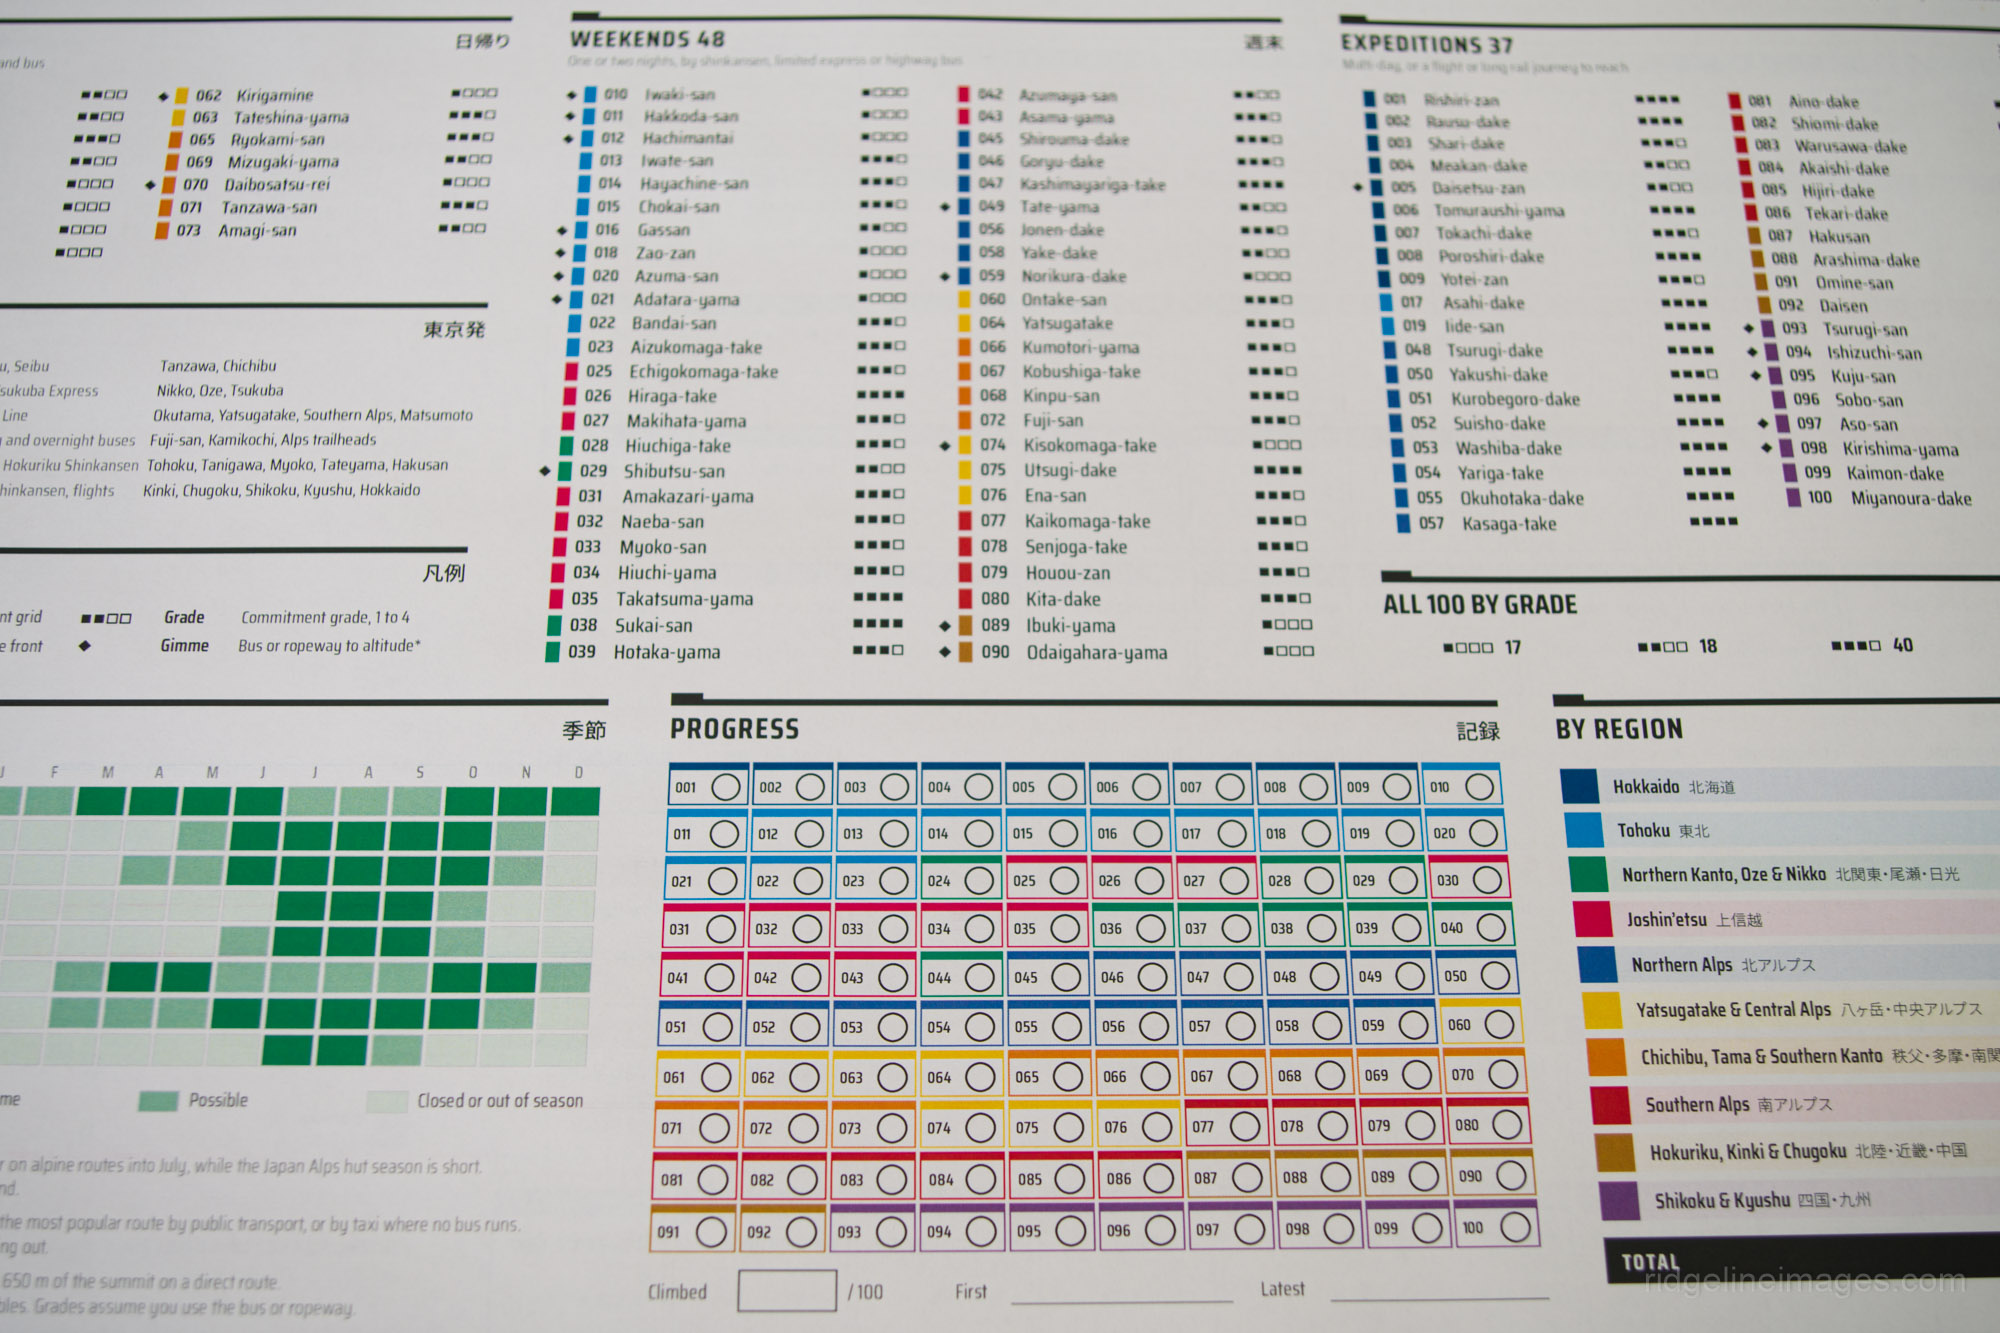
Reverse side showing the progress tracker.
Some tough calls
Putting 100 mountains onto one sheet sounds straightforward until you try it. There were a few decisions along the way that needed more thought than I expected.
Regions. Japan’s geography doesn’t divide neatly into ten convenient groups, so some compromises were unavoidable. Shikoku, for example, has only two Hyakumeizan, so it didn’t make sense to give it a regional category of its own. It shares one with Kyushu instead.
Then there are mountains that don’t fit neatly into a single regional idea. Hiuchiga-take is the highest mountain in Tohoku, for example, but it also sits within Oze National Park, which stretches across four prefectures. So where do you put it? The aim wasn’t a perfect geographical classification but a system that is useful, readable and consistent across the whole sheet.
Seasons and transport. These also needed definitions that work from Rishiri in the north to Yakushima in the south. The season bands are therefore deliberately broad, while the transport categories describe the general nature of the journey rather than providing a timetable. Treat them as starting points for planning, not hard and fast rules.
Fukada’s numbering. It would have been much tidier to renumber the mountains so that each region formed a neat block of colour, as some Hyakumeizan maps have done. The numbering follows the order of the original book, running broadly north to south from Rishiri-zan to Miyanoura-dake, and it’s the numbering many other lists, maps and records use.
So the canonical 001–100 order stays exactly as it is, and colour does the geographical work instead. The result is a grid in which the regions mostly cluster but occasionally overlap. While not perfect, it’s a fairly honest reflection of the list itself.
Commitment grades. The grade isn’t a technical difficulty rating. A mountain can be technically straightforward yet still involve a long approach, considerable height gain, remoteness or complicated hut logistics. Another can be physically demanding without being particularly remote. The Ridgeline commitment grade combines terrain, distance, height gain, remoteness and hut and camping logistics into a single number. A grade 4 doesn’t necessarily mean a multi-day trip either: a very long single day, such as Hiraga-take, can earn one too.
The grade describes what the hike asks of you once you’re in the area, including getting to the trailhead by public transport when travelling by public transport. The Day Trips, Weekends and Expeditions categories answer a different question: how much of a trip it takes to get there from Tokyo.
For some of the grades, particularly for mountains I haven’t yet climbed myself, I drew on the excellent hiking guides of Emma Goto and Cecilia of Lost Filipina. Their public transport details were invaluable for assessing which routes are realistic without a car and how big a trip each mountain really is. Both are well worth a look if you’re planning your own Hyakumeizan trips.
Putting it together
The A3 master was built from scratch in Adobe Illustrator, with every element kept editable.
The starting point was my existing dataset of all 100 mountains, but turning that into a useful visual reference was a design problem rather than simply dropping data into a grid. The overall composition came first, and I went through several rounds of rearranging the grid, regional colours and map before filling in the finer details. With 100 individual tiles, even a small change to the layout can ripple across the entire page and create a major headache. The goal was to create something you’d actually want to look at, not just refer to.
The periodic-table idea sits at the heart of the design. The 10×10 grid is the dominant element, with saturated colours used for the top bars. The tile interiors are kept near-white so the information is easy to read.
The map of Japan gives the front another strong visual element rather than simply filling the remaining space. The reverse follows the same basic design, tying the two sides together as a single guide.
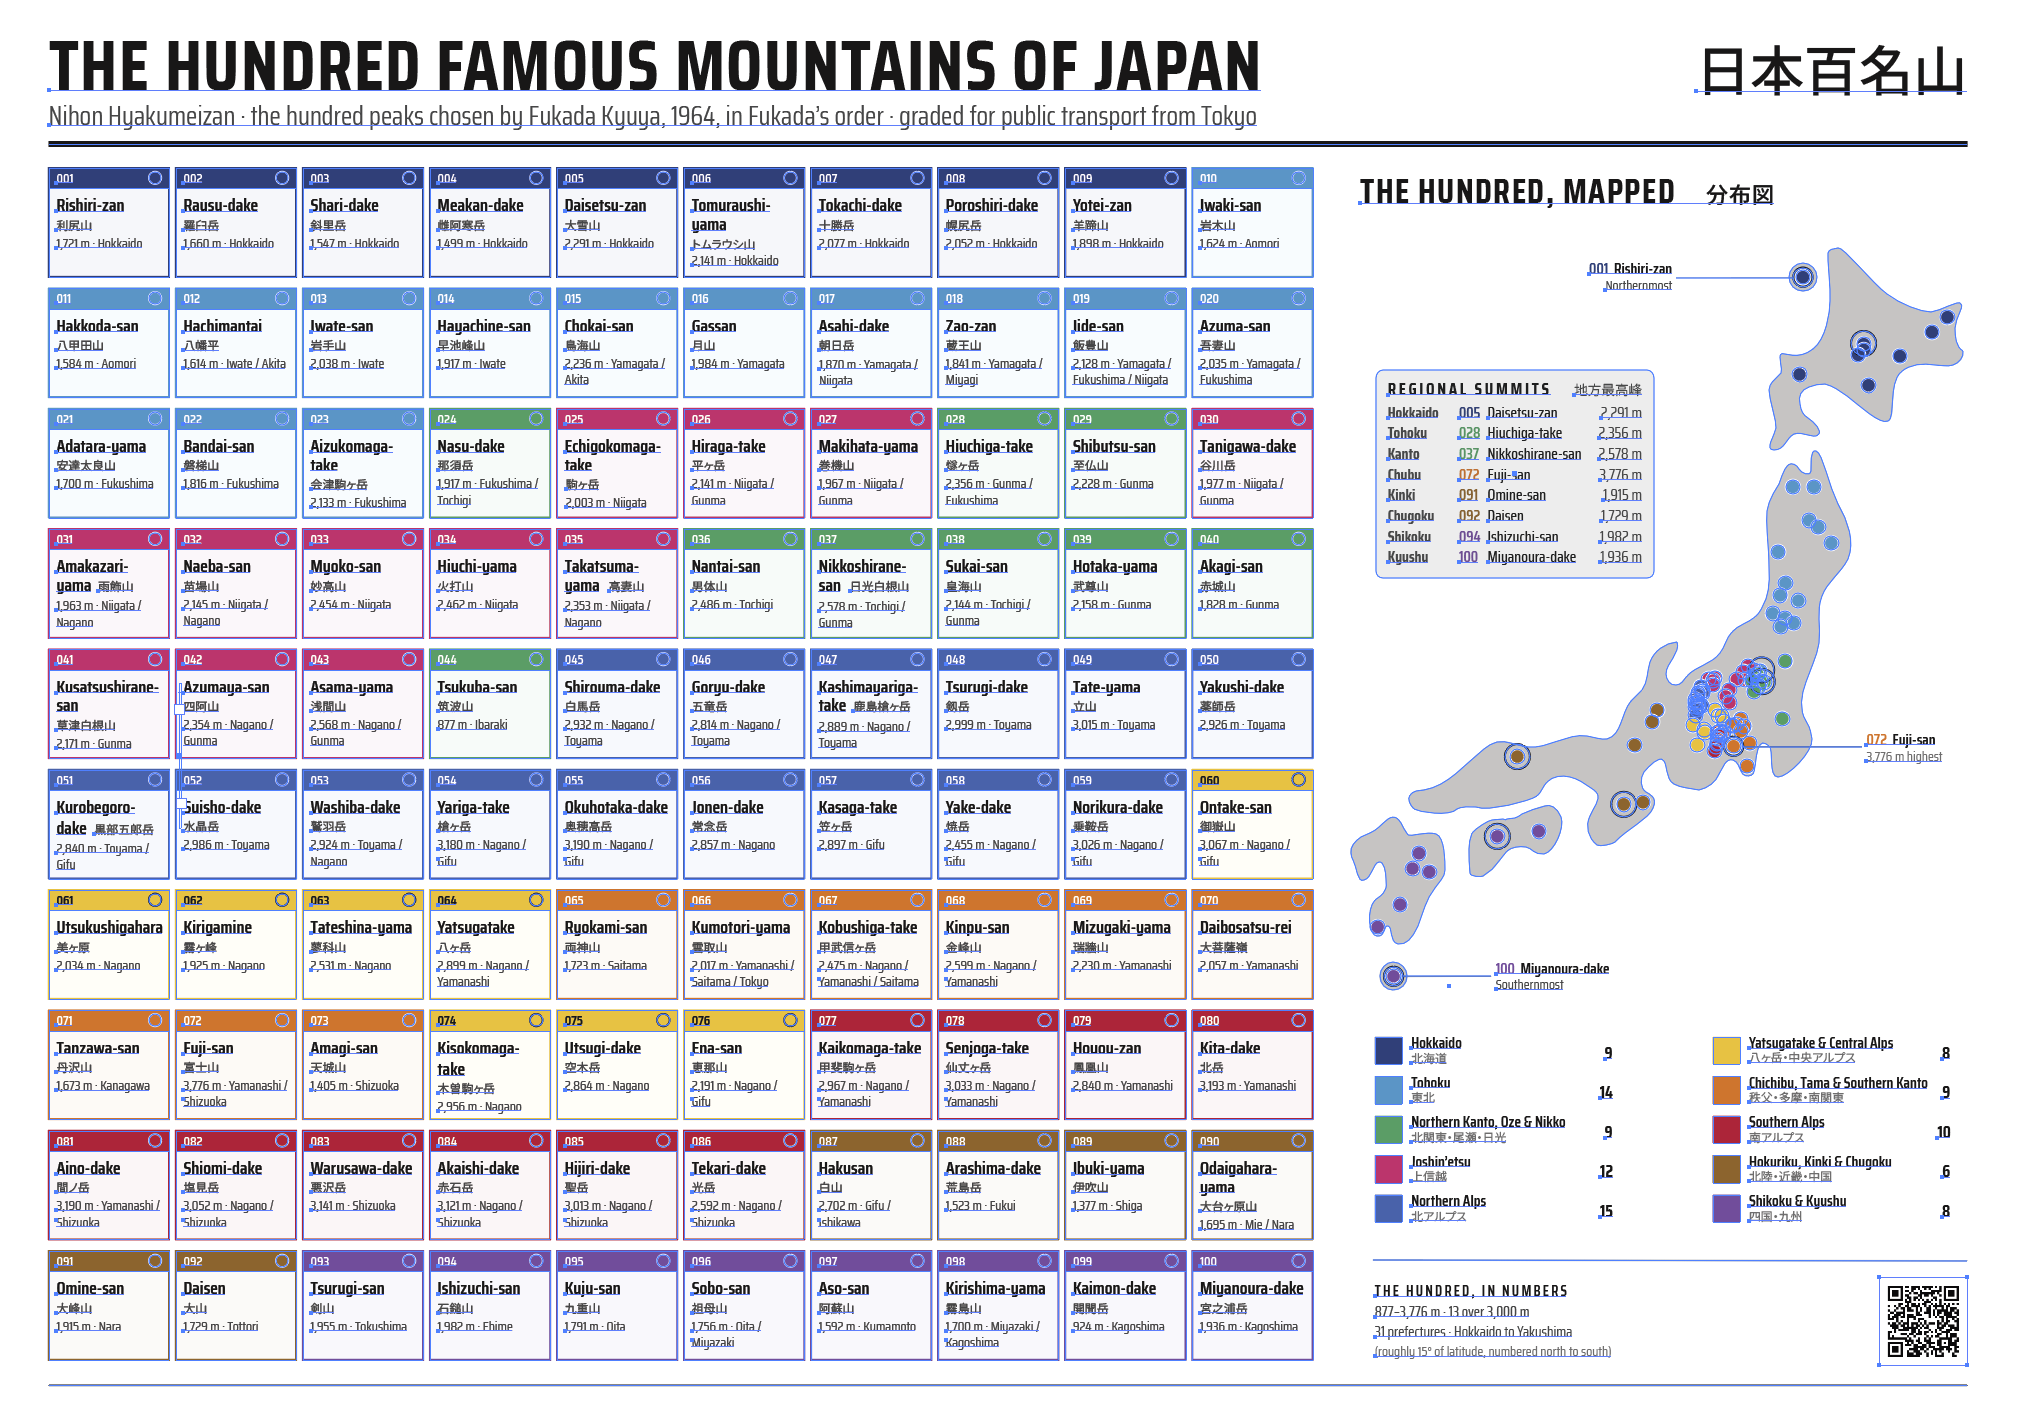
Designed from scratch in Adobe Illustrator.
Ultimate aim
I didn’t set out to make another definitive guide to the Hyakumeizan. There are already authoritative books on the subject, including Martin Hood’s One Hundred Mountains of Japan. I wanted to do something different: put all 100 mountains in one place, show where they are, and then answer the more practical question of what it would actually take to hike them from Tokyo.
The front puts all 100 mountains in one place. The back adds the practical information for planning them from Tokyo, while the progress grid gives you a way to keep track of the ones you’ve climbed.
Whether you’re starting on your first Hyakumeizan or have already ticked off dozens, the idea is simple: take a famously unwieldy list of 100 mountains and make it possible to see the whole thing at once.
How to get it
The guide is available on Ko-fi for 500 yen, with ‘pay what you want’ enabled. If you find it useful and would like to support the work, anything above that is genuinely appreciated and goes directly towards future projects.
Patreon supporters can download it free from the feed as a small thank-you for helping keep this blog going.
Most people don’t have a colour A3 printer, but that’s no obstacle in Japan. Any convenience store multifunction printer will do the job. I printed mine double-sided in colour at 7-Eleven for just 160 yen.
If you spot an error or have suggestions for future editions, I’d be glad to hear them.
Double-sided A3 · 100 mountains · ten regions · From Tokyo planner · print-ready PDF
From 500 yen · pay what you want · free for Patreon supporters
Instant download
One-time payment. No Ko-fi account required.
An excellent idea, and thank for explaining the thinking behind it. For my own random Hyakumeizan excursions, I’ve mainly used one of the Japanese-language compendiums – these give a good overview of the hiking route and public transport options. The weakness of such guides is that they tend to treat each mountain in isolation – whereas, if you really intend to collect all one hundred, what is needed is some kind of (perhaps AI-enabled) “optimisation routine”, telling you which mountains can be climbed in combination with which others … Your Field Guide seems to take a very useful step in that direction.
Thanks, PH. You’ve put your finger on exactly the gap: the Japanese compendiums are excellent on individual routes, but they don’t help you plan a campaign. The region colours and the Day Trips / Weekends / Expeditions split are my first step in that direction. Version 2, a proper Hyakumeizan trip optimiser, is some food for thought.
Nice summary! I’ve got a half-written draft lingering about for this myself, it’s always seemed quite the daunting task to finish it but I think you have inspired me 🙂
Thanks, Emma. Your blog was super helpful when I was trying to figure out how to reach quite a few mountains I hadn’t hiked myself, and how long the journeys were likely to take. And yes, getting all 100 mountains into something coherent is quite the task. Good luck with it!